How to Make an eLearning Storyboard: Step-by-Step Guide Plus Links to Templates
- Introduction to storyboarding in eLearning
- Why you should use storyboarding in eLearning
- Tips for effective storyboarding
- How to create your eLearning storyboard
eLearning storyboards are a big help when you're designing eLearning development courses
In this piece, we'll show you how to make them. And we'll highlight some top tips that you might not have thought of, too.
Whatever your role in the eLearning industry, this piece is packed with solid advice for rapid eLearning prototyping. Let's do it.
Introduction to storyboarding in eLearning
A storyboard is a great way to tell the story of your training course. It's an onscreen authoring tool where the instructional designer (that's you!) sets out a framework for the eLearning course they want to build.
When you create your eLearning content, you should follow instructional design principles. This will guide your storyboarding process, helping you to present course content in a way that captivates your learners.
As well as the words, it's important to consider your visuals. How can you use infographics, animations, photos, icons, and more to support your learning objectives? We'll think about all of that – and more – below. Embracing technologies like ai tools for storyboarding can enhance this process, enabling you to create more dynamic and effective eLearning storyboards.
The Shortcut to Effective Storyboards.
Boords is an easy-to-use storyboarding tool to plan creative projects.
Get Started for FreeWhat is an eLearning storyboard?
Storyboards for eLearning are training documents for online courses that eLearning developers and educators. Successful eLearning storyboards can help outline visuals, content and audio to play up interactivity that makes learning easy and effective.
Why you should use storyboarding in eLearning
The best eLearning content is interactive and leverages graphics to help students retain information. Storyboards can help eLearning developers and teachers collaborate on effective curriculae and can help everyone save time designing online courses.
Read on to see how developers and educators benefit from storyboarding:
1. It helps you visualize the eLearning design
Storyboarding is great for visualizing how your training will look when it's finished. You can think about the course design in more detail: the images you'll use, the screen text that'll appear, and any audio narration (voiceovers). This all helps during the development process.
2. It lets you collaborate on the design process
We all have gaps in our knowledge. That's why collaboration is so important. By storyboarding your course, you can run it past other people – like a subject matter expert, project manager, graphic designer, and other team members – before you dive into the development phase.
3. It highlights weaknesses in your eLearning experience
Prototyping your learning material in a visual storyboard means you can test out the training – spotting any holes before you start designing the online course. If you go through it like a regular user, you'll definitely see opportunities to captivate learners.
4. It saves you time
Storyboarding can seem like a lot of effort, and it's often tempting to start designing your online course straight away. However, this stage is crucial for your project management. Any time you invest now will pay off later because you'll gather tons of feedback before starting the development process. Plus, it's a breeze with a tool like Boords.
Tips for effective storyboarding
The Shortcut to Effective Storyboards.
Boords is an easy-to-use storyboarding tool to plan creative projects.
Get Started for Free1. Define your learning objectives
Whether you're creating a course for students or SMEs, here's the bottom line: you need to be crystal clear about the outcomes you want to see.
- Why are you making this eLearning course?
- What are your goals?
- What does success look like?
- What should the learner take away from the process?
- What do they need to know before they start?
Your answers to these questions will inform the entire storyboarding process. If you're stuck, you might want to meet with subject matter experts to see what you need to cover and what you can skip.
2. Create your assessment criteria
It's also important to consider what type of assessment will work for your audience. Think about where you'll place knowledge checks (like tests or exams) in the course, as well as lesson summaries and recaps. Each learning objective should align with the levels of Bloom's Taxonomy.
3. Pick a design model
Think about different design theories that can help you deliver effective eLearning content. There are loads to choose from – like ADDIE, Gagné's Nine Events of Instruction, Knirk and Gustafson, SAM, or action mapping.
4. Know your target audience
Your eLearning storyboard will only be as good as your research. Use focus groups, surveys, and interviews to find out as much as you can about your learners before you start making anything.
5. Choose an authoring tool for your storyboard template
Naturally, we think that Boords is the ultimate storyboard authoring tool. It's slick and intuitive, so you'll be a pro in no time. You can also invite collaborators to work on your project with you. And it's free to try!
If you want to use something different, we won't hold it against you. Lots of people opt for Microsoft Word, Powerpoint, or Lectora. But there are masses of eLearning authoring tools out there. All of them will help you nail the storyline of your eLearning project.
Get your FREE Filmmaking Storyboard Template Bundle
Plan your film with 10 professionally designed storyboard templates as ready-to-use PDFs.
How to create your eLearning storyboard
Now that you've got a feel for what goes into an effective storyboard, let's take a look at how to configure your storyboard – and some of the specific items you need to include.
1. Set up your storyboard
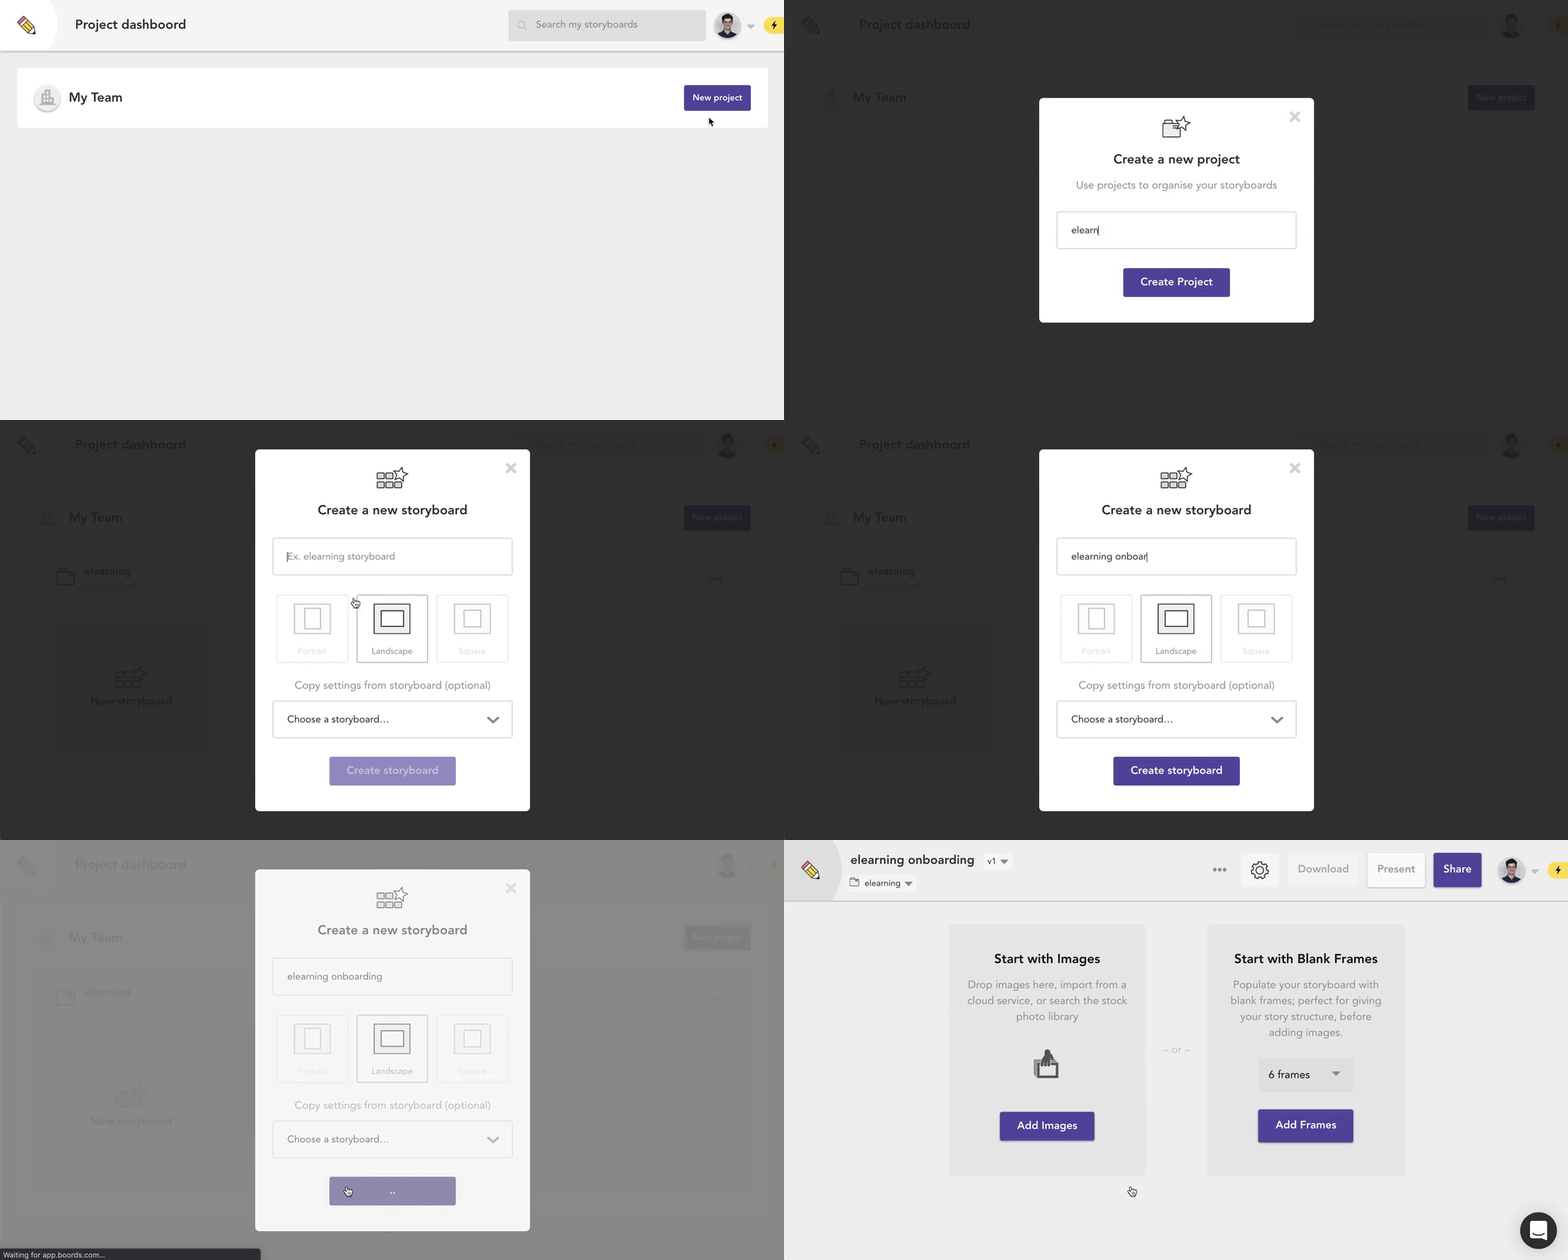
- Go to your Boords dashboard, click
New projectand name it after your eLearning content - You'll be prompted to create a new storyboard – you can give that the same name
- Click
Create storyboard
2. Customize your fields
You can use custom fields to create space for all the items you need to include in your eLearning storyboard.
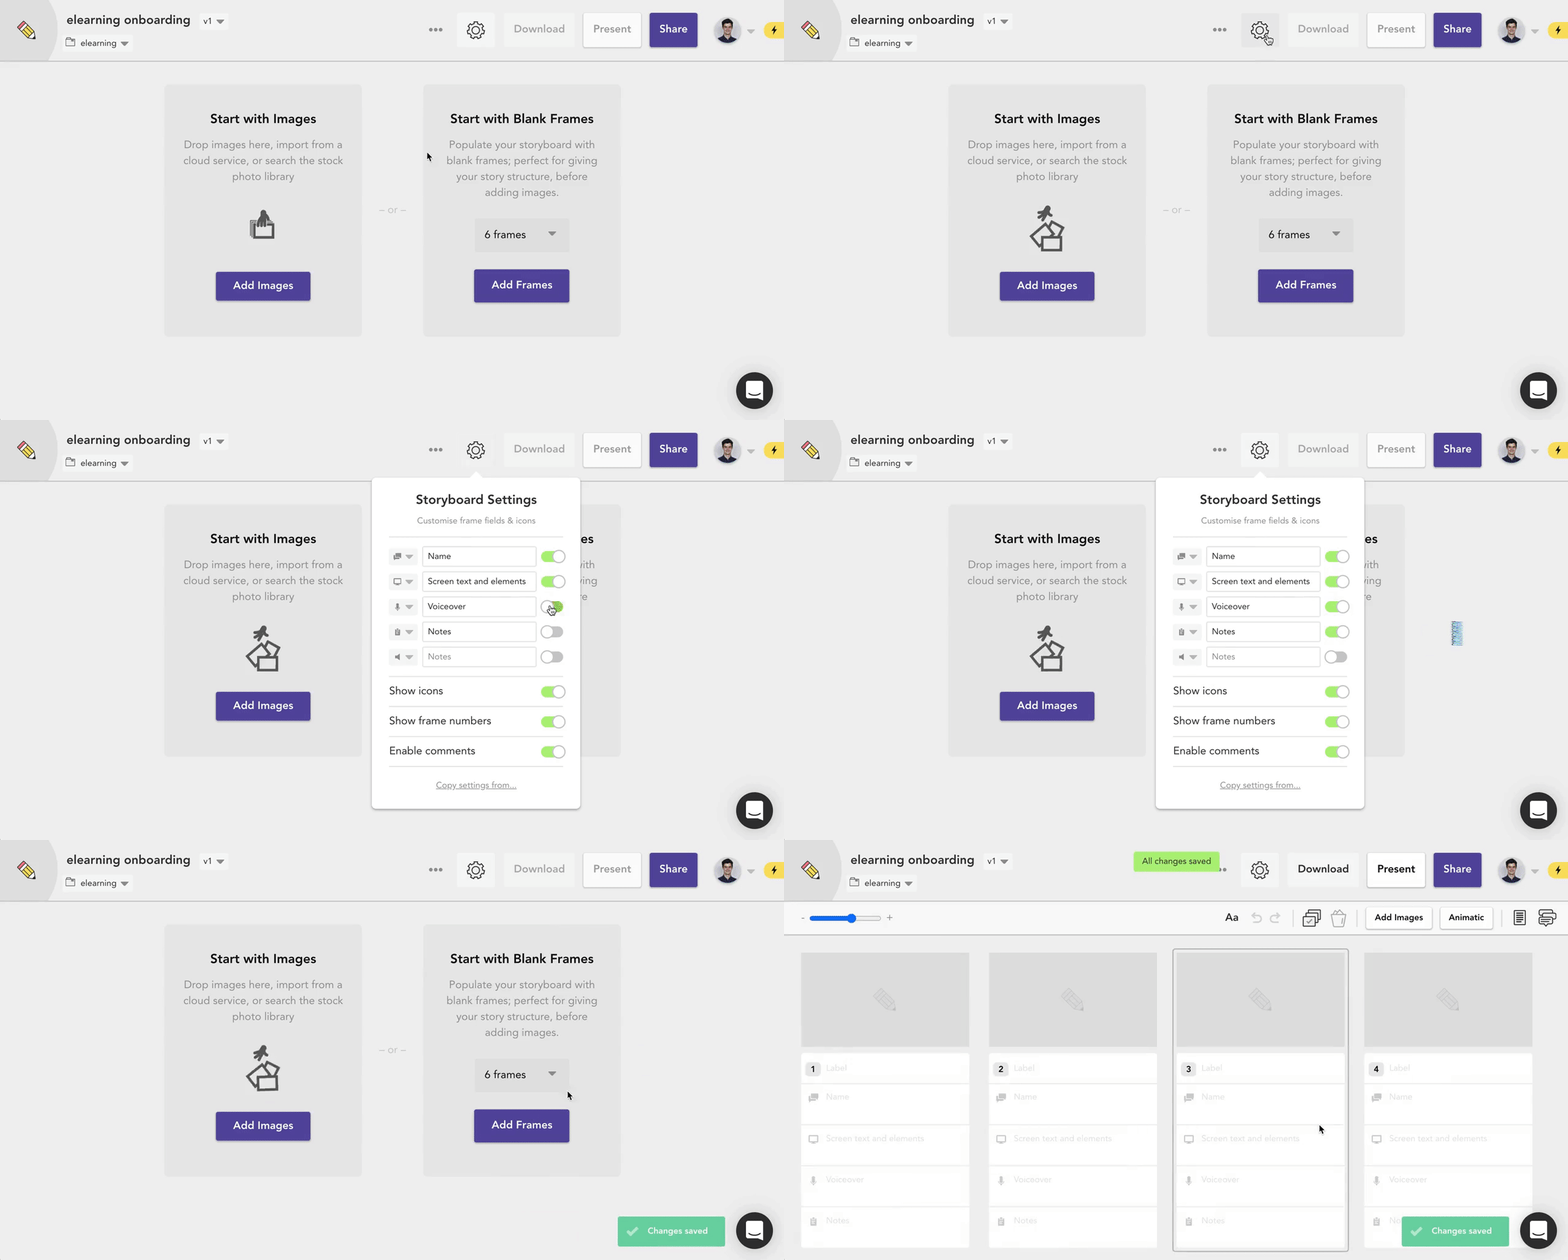
- Click the settings cog to open the storyboard settings menu.
- Edit the default
SoundandActionfields so that they're relevant to your project, likeNameandScreen text and elements. - Add any other new fields that'll be useful for your storyboard.
Below, we've created a list of items you'll probably want to include.
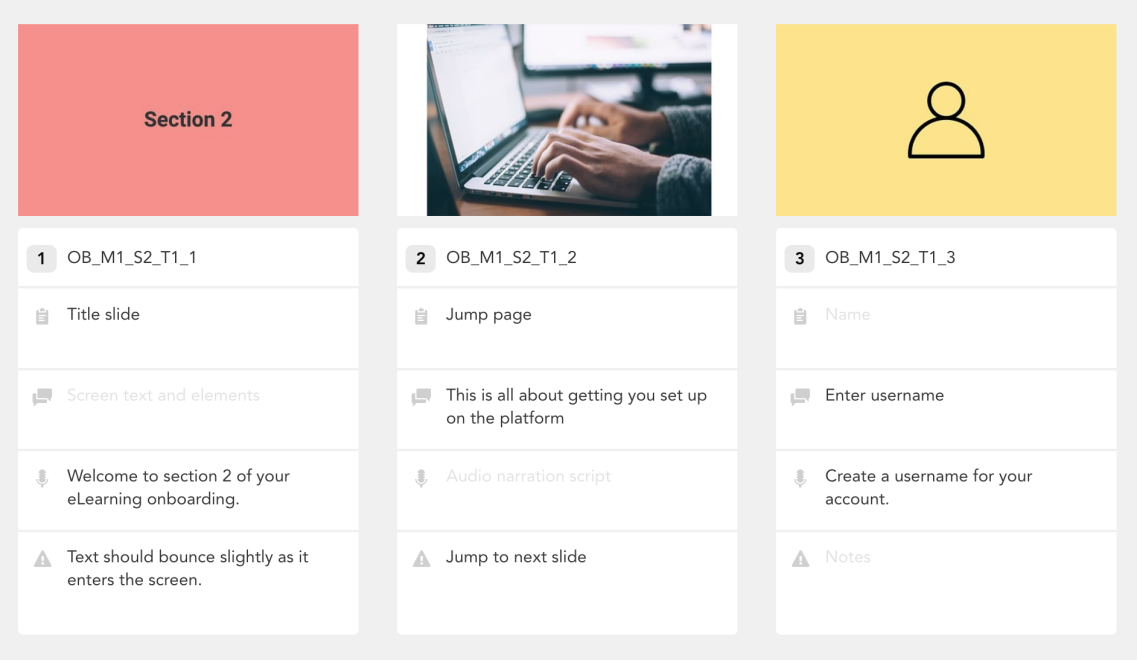
2.1. Screen / slide number
A proper screen and slide numbering system will keep your different eLearning project consistent – and make it much easier when you collaborate with others.
For example, you might number a slide 1_OB_M1_S2_T1. It looks confusing until you start to break it down.
- Slide number: Slide 1 (1)
- Course name: Onboarding (OB)
- Module number: Module 1 (M1)
- Section number: Section 2 (S2)
- Topic number: Topic 1 (T1)
Simple, right? This makes things go smoothly when you're in the review process and need to ask someone to make an edit on a certain slide. You can point them to exactly the right place. Boords automatically handles slide number changes for you, too.
Your eLearning course might have an entirely different structure to the example above. In which case, go wild and create your own naming structure. Just make sure it's consistent.
2.2 Slide title / name
This could be the visible Title line of the slide, or a description of the slide – like Jump page or End slide. Whatever you use, the most important thing is to keep your naming consistent.
2.3 Screen text and elements
This takes up a lot of space in your storyboard. It's generally the main part of the course content. In short, it's all the visible text on the slide, and it should appear in the order and format that you want it displayed.
2.4 Navigation
If your course includes places where the user is taken to a different part of the course after clicking on a certain part of the screen, you need to describe these in detail. For example: jump to next slide / previous slide / slide 10 / quiz, etc.
2.5 Audio narration script
This is the narration text that will be used in the voiceover. Make sure you get the project owner to sign off on this separately – it'll avoid costly amends at a later date.
3. Add notes
Add a final custom field, Notes, where you can include things that you haven't covered yet, like:
3.1 Branching
If your eLearning course is on the complex side, then it might include branching. This is when the user makes a choice that determines the screen that comes up next – kind of like a choose your own adventure novel.
This might be a decision to get further information on a topic, or the answer they give for a question or interaction. Just make sure the developer knows exactly where the user should go next.
3.2 Developer notes
If there's anything your developer needs to know to translate the storyboard into eLearning content, this is the place to write it. Time spent figuring this out now will save you time later.
3.3 Other audio
If you plan on having music or sound effects on any screens, this is the place to explain it. If your developer needs access to any files, make sure they can find them.
4. Add images
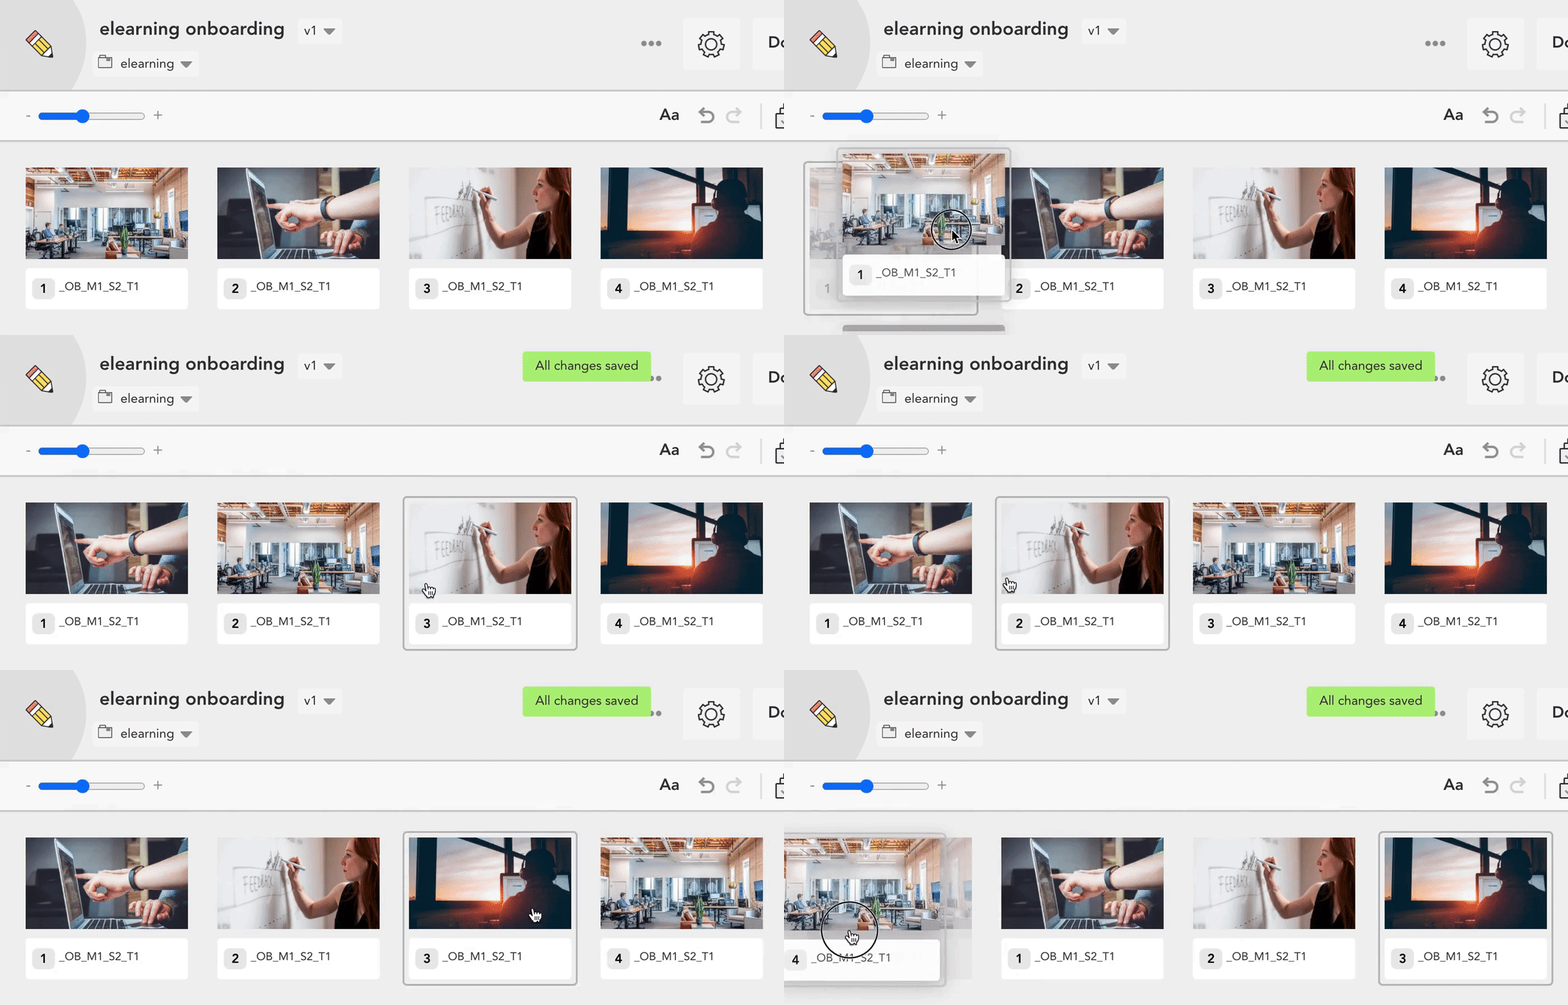
Unless you're a designer, the goal here is to include placeholder graphics or mockups that help your designer or animator to make the final product.
For images, you can include a thumbnail of examples you want to use. For animations, you'll need to write a description of what you want, and include timings to help the animator.
5. Get feedback
At this point, everything should be looking pretty sweet. But before you start building the final product, you should take one more look at the outline and send it to stakeholders for feedback.
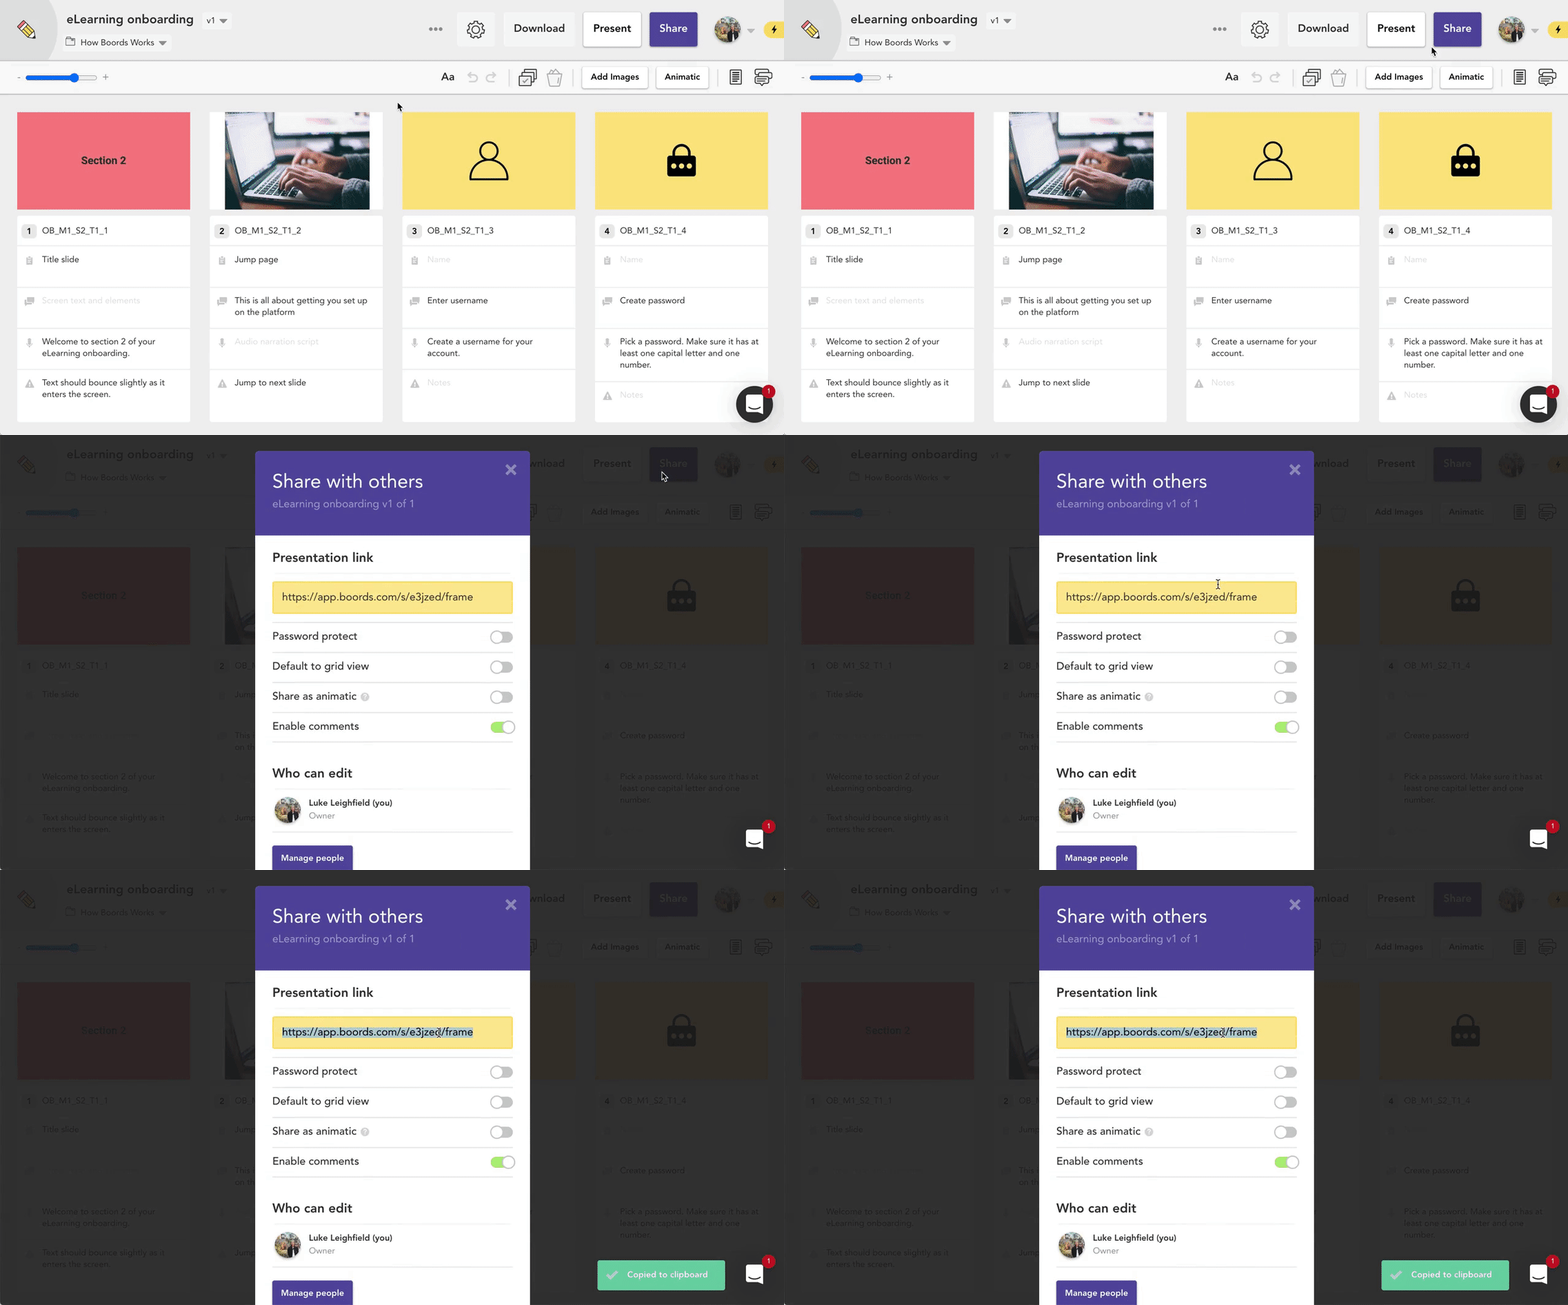
- Click
Sharein the top right of the screen - Copy the presentation link
- Send the link to your team for feedback
- Optional: click
Manage peopleto give team members editing access
It's a lot easier to make changes while you're still in the storyboarding phase. Once you start enter the design phase, amends take longer – costing you time and money.
Create your eLearning content with Boords
Instructional designers around the world love Boords. It's the perfect authoring tool for educators and anyone else with a passion for storyboarding. We even feature eLearning storyboard templates. Start using Boords free.